Serving Sites with NGINX QUIC

Photo by Markus Spiske on Unsplash
NGINX has recently released prebuilt binary packages for the preview NGINX QUIC+HTTP/3 implementation for Red Hat Enterprise Linux 9 and Ubuntu 22.04.
The prebuilt binary packages eliminate the need to compile from source and automatically install a quicktls library package as a dependency as OpenSSL does not yet support QUIC.
QUIC
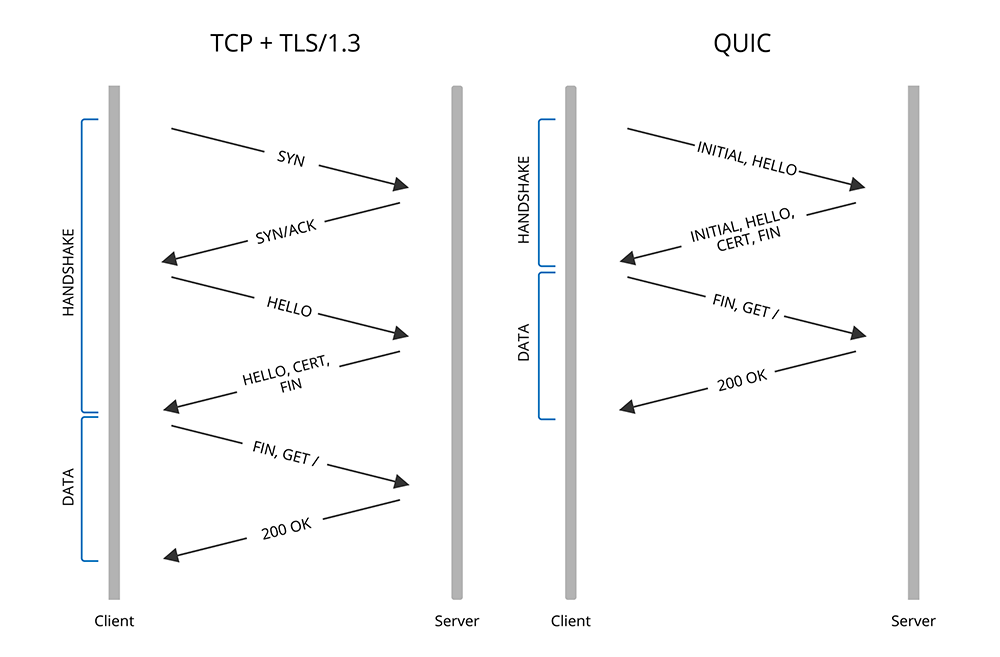
QUIC is a general-purpose transport layer network protocol that provides built-in security and improved performance compared to TCP + TLS. Its built-in security features, such as encryption and authentication, allow for the exchange of setup keys and protocols to take place in the initial handshake. Thus reducing the connection setup overhead and latency as shown by the diagram below.

For a more detailed breakdown of QUIC and how it works, checkout Cloudflare's blog article The Road to QUIC.
Using NGINX QUIC
What follows is a step-by-step guide on how to serve a website using NGINX QUIC. For this setup, we will use a newly created Ubuntu 22.04 server.
Update the system
We start by ensuring that the system is up-to-date as usual.
# Install the latest updates
sudo apt update && sudo apt upgrade -y

# Reboot if necessary
sudo reboot -h now
Install NGINX-QUIC
We then set up the repository and install the pre-built packages.
# Install the prerequisites
sudo apt update && sudo apt install curl gnupg2 ca-certificates lsb-release ubuntu-keyring

# Import an official nginx signing key to verify packages authenticity
curl https://nginx.org/keys/nginx_signing.key | gpg --dearmor \
| sudo tee /usr/share/keyrings/nginx-archive-keyring.gpg >/dev/null

# Set up the apt repository for nginx-quic packages
echo "deb [signed-by=/usr/share/keyrings/nginx-archive-keyring.gpg] \
https://packages.nginx.org/nginx-quic/ubuntu `lsb_release -cs` nginx-quic" \
| sudo tee /etc/apt/sources.list.d/nginx-quic.list

# Install nginx-quic
sudo apt update
sudo apt install nginx-quic
Firewall
Enable the firewall if it is not already enabled and make sure to allow UDP traffic through port 443. UDP uses a connectionless communication model, it is a fire and forget protocol. It is what makes the reduction of overhead possible.
# Adjust firewall
sudo ufw default allow outgoing
sudo ufw default deny incoming
sudo ufw allow ssh
sudo ufw allow 80/tcp
sudo ufw allow 443/tcp
sudo ufw allow 443/udp

# Enable firewall
sudo ufw enable
Certbot
Install certbot, or your favorite tool to issue and renew certificates. A lit of alternative clients can be found here. We will use snap to since it is the method recommended by Certbot. You can find alternative installation methods here.
# Make sure snapd core is up to date
sudo snap install core; sudo snap refresh core

# Ensure that no older version is already installed
sudo apt remove certbot

# Install the certbot package
sudo snap install --classic certbot

# Link the certbot command from the snap install directory
sudo ln -s /snap/bin/certbot /usr/bin/certbot
Site directory
We will now create a directory to store our site and its data. This is where the server will look for the site's contents when serving out visitors. You can choose a different location that the one I chose, just make sure to make the same adjustment in the other places that this path appears in as you follow along.
sudo mkdir -p /var/www/WEBSITE/html/
sudo chown -R www-data:www-data /var/www/WEBSITE/html/
sudo chmod -R 755 /var/www/WEBSITE
Webpage
With our directory created, we will now create a simple html page for the purpose of demonstrating the functionality. This can be replaced with your actual site contents when we are done.
# Create a sample index.html
nano /var/www/WEBSITE/html/index.html
Paste in the following snippet and save.
<html>
  <head>
    <title>Welcome to WEBSITE!</title>
  </head>
  <body>
    <h1>Success! The WEBSITE server block is working!</h1>
  </body>
</html>
Configure NGINX
It is now time to make some adjustments to our NGINX configuration.
sudo nano /etc/nginx/nginx.confAdjust the config file to match the following block, which is enough to get us started for now.
user  www-data;
worker_processes  auto;

error_log  /var/log/nginx/error.log notice;
pid        /var/run/nginx.pid;


events {
    worker_connections  1024;
}


http {
    include       /etc/nginx/mime.types;
    default_type  application/octet-stream;

    log_format  main  '$remote_addr - $remote_user [$time_local] "$request" '
                      '$status $body_bytes_sent "$http_referer" '
                      '"$http_user_agent" "$http_x_forwarded_for"';

    access_log  /var/log/nginx/access.log  main;

    sendfile  on;
    keepalive_timeout  65;
    gzip  on;

    include /etc/nginx/conf.d/*.conf;
}
What follows is a brief explanation of what the different directives and values do.
userdefines the user used by the worker processes.worker-processesthe number of worker processes. Setting it to the number of CPU cores is a good start,autoautomatically detects it for us.error_logdefines a log file to store logs and the level of logging.piddefines a file that will store the process ID of the main process.eventsconfiguration of connection processing.worker_connectionssets the maximum number of simultaneous connections that can be opened by a worker process.
- the top-level
httpblock.include /etc/nginx/mime.typestells browsers how to handle different file formats.default_type application/octet-stream;tells browsers to treat files not identified in/etc/nginx/mime.typesas downloadable binaries.log_formatspecifies the log format.access_logsets the path and format for logging.send_fileensures that nginx operations will not block disk I/O.keepalive_timeoutthe duration to keep worker_connections open for each client.gzipcompress data to browsers to enhance performance.include /etc/nginx/conf.d/*.conf;include all configuration files in provided directory.
Create the website configuration
We will now create a configuration file for the website in the /etc/nginx/conf.d/ directory inline with the new conventions which you can read more about here. All .conf files placed in this directory are included in the top-level http block.
sudo nano /etc/nginx/conf.d/WEBSITE.confPaste in the following content and save the file.
server {
    listen 80;
    server_name WEBSITE www.WEBSITE;

    root /var/www/WEBSITE/html;
}
What follows is a brief explanation of what the different directives and values do.
serverdefines a new server block for nginx to listen to.listen 80the port nginx will listen on.server_namethe hostnames of the requests which should be directed to this server.roottells nginx where to look for content.
Start NGINX
It's time to apply the changes and start NGINX.
# Start and enable nginx on system startup if not already enabled
sudo systemctl start nginx
sudo systemctl enable nginx

# Check the status of nginx
sudo systemctl status nginx

# Make sure no errors were encountered
sudo nginx -t
Makes sure that no errors were encountered. The last command should display helpful information to help you troubleshoot any failed validations.
Generate certificates
With NGINX up and running, it is time to generate our certificates. We do this with the help of certbot. When prompted, fill in your email address and agree to the terms.
sudo certbot --nginx -d WEBSITE -d www.WEBSITEThose certificates are valid for 90 days. Certbot adds a systemd timer that checks our certs for us twice a day and renews any certs that will expire within 30 days.
We can verify the status of the timer by running the following command.
sudo systemctl status snap.certbot.renew.serviceWe can also test the renewal process by running the following command.
sudo certbot renew --dry-runLet's Encrypt will also send you a warning email to the email account you provided when creating the certificates if the renewal process fails.
Enable QUIC
Certbot should now have generated the certificates for us and updated our site's configuration file accordingly. We need to make some final adjustments to enable QUIC.
sudo nano /etc/nginx/conf.d/WEBSITE.confAdjust the file's contents to match the following block.
server {
    # Using the same port number for QUIC and TCP
    listen 443 http3 reuseport;       # IPv4 QUIC
    listen 443 ssl http2;             # IPv4 TCP
    listen [::]:443 http3 reuseport;  # IPv6 QUIC
    listen [::]:443 ssl http2;        # IPv6 TCP

    # Server name
    server_name WEBSITE www.WEBSITE;

    # Site root
    root /var/www/WEBSITE/html;

    # Certificates
    ssl_certificate /etc/letsencrypt/live/WEBSITE/fullchain.pem; # managed by Certbot
    ssl_certificate_key /etc/letsencrypt/live/WEBSITE/privkey.pem; # managed by Certbot
    include /etc/letsencrypt/options-ssl-nginx.conf; # managed by Certbot
    ssl_dhparam /etc/letsencrypt/ssl-dhparams.pem; # managed by Certbot
}
server {
    if ($host = www.WEBSITE) {
        return 301 https://$host$request_uri;
    } # managed by Certbot

    if ($host = WEBSITE) {
        return 301 https://$host$request_uri;
    } # managed by Certbot

    listen 80;
    server_name WEBSITE www.WEBSITE;
    return 404; # managed by Certbot
}
Here, we added listen [::] so that nginx listens to IPv6 connections. You can remove this
directive if you have not enabled IPv6 for your domain. We have also configured HTTP/2 to be the
starting http version for new connections instead of HTTP/1.1 for better performance. Connections
will switch to QUIC after it is discovered. The second server block is used to redirect unencrypted
traffic to encrypted traffic.
Update: The configuration has changed. Use quic and ssl separately in listen directives and
enable http2 globally with http2 on;. Additionally, new
QUIC-related settings have been added:
    # Using the same port number for QUIC and TCP
    listen 443 quic reuseport;
    listen 443 ssl;
    listen [::]:443 quic;
    listen [::]:443 ssl;
    http2 on;

    # QUIC
    quic_retry on;
    ssl_early_data on;
    quic_gso on;
Apply changes
It is time to apply the new changes after checking that everything is fine.
# Make sure no errors were encountered
sudo nginx -t

# Restart NGINX
sudo systemctl reload nginx
Live!
The website should now be live with QUIC+HTTP/3 enabled.

Verify
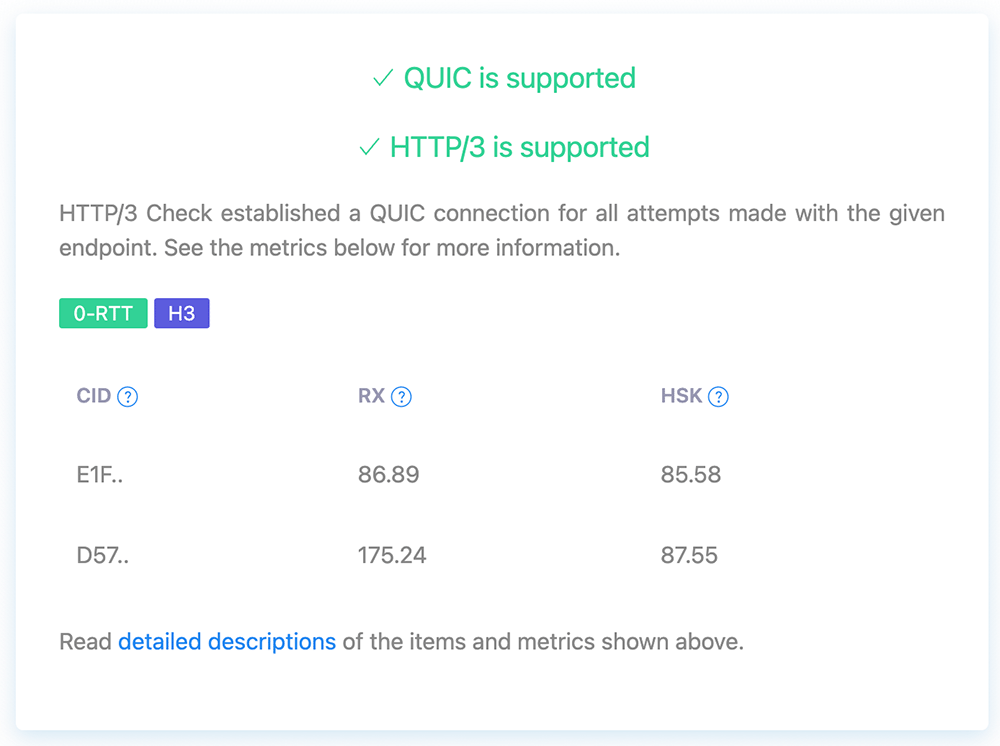
Head over to https://www.http3check.net/ to verify that QUIC and HTTP/3 are supported on your site.

Concluding Remarks
With this quic demonstration completed, there are some things to consider before using it. Given that internet service has gotten more reliable over the years, the likelihood of issues caused by dropped packages has become increasingly unlikely. At the same time, the amount of bandwidth saved makes it an attractive tradeoff especially on the server side. This is also a preview release. That said, there are several production deployments according to NGINX.
I will also cover topics such as optimising NGINX for performance and strengthening security through the use of headers in future posts.